Thinglink is a website that helps you tag an image.
It turns the image into an interactive teaching tool.
Imagine wanting to teach about the brain. On an image of the brain you could add a Thinglink tag to each area of the brain. When a student clicks on a tag they may get some text, more images, a video or possibly a link to another site. There are no limits on how many tags one image can hold.
All of that interactive visual material pulled into one image.
Have fun! Don’t let it consume too much free time :)~
GoGuardian student monitoring program
GoGuardian is a student monitoring system that I have been using for a little over 2 years.
It is a great way to monitor students while they should be completing work, whether remotely or in your classroom so that you can keep a safe distance. Our district requires students to use a school provided Chromebook, you cannot monitor them on their own devices if they do not have the extension.
I recently created a GoGuardian training Google Slideshow.
I compiled a bunch of short videos to help with different areas of the program and added some tips that I thought would be helpful and presented it to teachers from our district.
When we return face to face I intend to try out the Lecture portion of GoGuardian. It will be the best way to make sure students are looking at the screen I would like them to. I will have the agenda on their screen to start the class period and will use the Lecture feature if there is something I would typically present on the big screen but will be more visible to them on their screens in front of them. You can also select students to present from their screen. GoGuardian allows you to record these Lecture sessions, so you can share them with absent students.
Here is my training slideshow. You will be prompted to make your own copy. Feel free to use and share. I hope it is helpful.
I highly recommend that teachers take the training course from GoGuardian. It is set up very nicely with short videos for each topic. I took it and earned my badge.

Auto generate a Google Slide for each student
Alice Keeler has done it again!
She has created an unofficial Add-On for Google Slides that lets you generate a slide for each student.
Each student has a slide with their name already on it after a quick setup.
If you create an assignment where students only have to create one or two slides, this would be a huge timesaver! Grade them all in one slideshow.
She also gives an overview reminder of how to use Master Slides in Google Slides. Also a timesaver.
There isn’t anymore for me to say but check out this link with her instructions.
Accidentally closed a tab in Chrome?
I didn’t know there was a fix to this other than going to my History and searching for the tab, assuming I remember what it was. A difficult task if the tab has been open a while.
This short video shows you the trick and a few others:
Multi User word cloud
Answergarden is a great way to complete some quick and anonymous formative assessment.
If you are familiar with word clouds, that is what you end up with. Simply share your question with your students and a word cloud is generated. The words that are the largest have had the most answers. Here is a copy of one from their website:
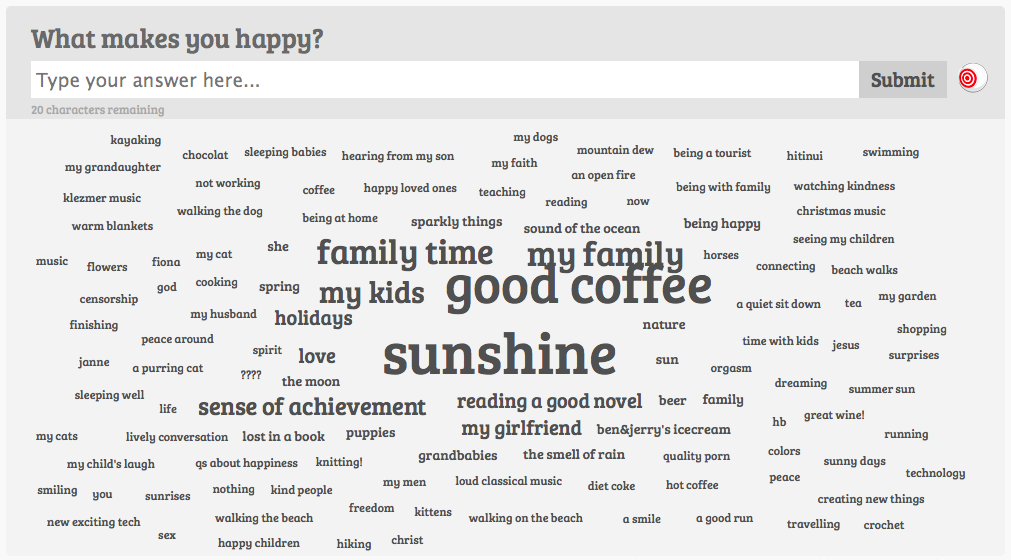
I am using it in my class this week to ask students to name their favorite sports in Spanish.
I imagine there are many possibilities: See if students end up with the same answer to a Math question, give one adjective that describes the hero of a story, name the members of the Presidentś cabinet, etc.
Students can answer as many times as they want (just a warning). So it is possible to ask a question like What are the primary colors? and students can name them all. If just those colors are listed big and bold, they did well. If other colors appear, you can have a conversation about it or reteach.
Create a graph
I stumbled on this site to make graphs in a Google search.
It is part of the National Center for Education Statistics. I was stuck poking around in the site for quite a while. Lots of great stuff! Here is an image of their menu:

Back to the reason I arrived there in the first place. I was searching for a place to allow my students to make a chart of their frequent pastimes in Spanish. This page makes it easy. It gives the students steps to make their chart or graph and allows them to download it to their Google Drive.
There are 5 choices of graphs as seen in the image below. Another great find!

Emojipedia
Quite a few of my friends love emojis. For texting, emailing, whatever… I use them too but sparingly.
In this time of communicating with students mostly through Zoom, Google Classroom and email, I have begun to use more emojis to lighten the mood and maybe put a smile on faces. It is very familiar to students, they relate well to emojis.
Emojipedia is a great tool to use emojis on your computer. The emojis they create are considered text and are text size. You can search for them easily and they are easy to copy. You can add them in places where you cannot put images. I use them in front of topic and assignment titles in Google Classroom. I put them in comments on assignments in Google Classroom. They also can be inserted in Skyward messages and Gmail. You can use them in sentences in Google Docs. Use them anywhere you use text and want to spruce it up.
Here is what it looks like in my Google Classroom. Unfortunately there is not an emoji for every date of the year. The emoji tells students the nature of the item. The calendar emoji means it is the daily slideshow.

Please comment if you think of another way to use emojis from Emojipedia.
Use the Arrange menu in Google Slides.
I like to use Google Drive to create activities and other documents because you can put text boxes, images and whatever else you use anywhere you want. You cannot do that in a Google Doc which can be very frustrating.
If you used Publisher many moons ago, that is what I like to compare it to.
The menu that will help you most if you are using a combination of items (text & images, etc), is the Arrange menu. If, for example, you find one image is in front of another you can use the Arrange menu, click on Order then move the image to front or back. Make sure you have the item you want to arrange selected.

I recently discovered that you can also center an item (text box, image, etc) on the page easily with the Arrange menu. Select the item you want to center. Click on Order, then you can center it vertically or horizontally as you can see in the image below. If you choose the Rotate option, you can rotate or flip an image.

Happy creating!
Make interactive Google Slides full screen.
There is a Chrome Extension to make your interactive slides full screen.
I have had trouble having a video on the slide or other interactive items while in Zoom meetings. Exiting Present mode is not as easy as it should be, slides advance on their own when you click on something, the video starts over, you know the problems…
I learned about this new extension reading this blog post. I do not use a lot of Chrome extensions, but I will be adding this one.
Free and easy image/meme creator

I just found this today. Photofunia allows you to put photos or text in different settings and scenery.
I made this one today in less than one minute. It’s even animated! Have fun!

